Today we will create one of the most important part of any website, it’s called Opt-in form. If you are a marketer or running a business online, you need some method to capture your readers email and other information.

As they say one of the effective marketing method is thru email, but what is an Opt-in Form? Here is the breakdown: The opt-in form must make it easy for a prospect to provide two critical pieces of information: an email address, and a name. The form must be carefully designed to get this information effectively.
Just like any other ad components that have been crafted properly, your visitors will already be “presold” on what you are offering them. The opt-in form must eliminate any misgivings, a visitor might have about filling out the form and hitting the submit button. The basic components of the opt-in form work together to accomplish this.
You can download the PSD at the bottom of this tutorial!
The basic components of an opt-in form are:
- Call to Action
- Contact Collection Fields
- Privacy Statement
Call to Action
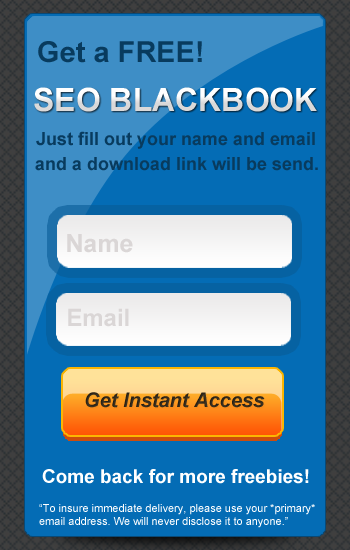
At the top of the opt-in form, you remind your prospects what you are offering and what they need to do to get it. Here is a sample call to action:
“Get a Free SEO BLACKBOOK, Just fill out your name and email and a download link will be send.”
The submit-button text can also be used as an additional call to action. For example, the text could be changed to something like, “Get Instant Access Now”
Contact Collection Fields
For lead capture, the minimum required information should be a prospect’s first name and primary email address. Asking for just a first name allows the prospect to maintain some anonymity and is less threatening. If required to enter a last name, some prospects will shy away from completing the form.
We tend to want as much contact information as we can get. However, you will lose prospects if you try for too much information too soon. You must gain their trust first before asking for more personal information. By asking for a phone number or, much worse, making a phone number a required field, you will drastically reduce the number of your opt-in prospects.
Tutorials
Ok, now that you know the importance of having an Opt-in Form let’s try to create one. Using the above method we will design an effective form that will gain us trust from readers and also will benefit our Online Business.
Today we will create this Opt-in Form that you can use for your website.

Let’s begin
We will start by creating a new layer.

And select Rounded Rectangle Tool (U), and pick your Foreground Color #046cb5, make sure you’ll leave some margin.

Create a new layer and name it Index. Select your Pen tool (P), click on the top right part and then on the left down part of the image. After that click on the middle of the line, this will be easier to bend.

Now, drag the middle to your upper left just like the image below. Don’t overdo it though!

After that, create a new layer name it shiny and close the path and fill it with #FFFFFF. Ctrl + click the index layer and press Ctrl + Shift + I to select the edges of the shiny layer and then press delete.

Now, set the opacity to 30% and move shiny layer by 2px right and 2px down by pressing your arrow and left key twice.

Write the text “Get a FREE!” and set your Foreground to #083b5e, set your font 29pt, Arial Bold.

Set your Foreground color to #FFFFFF, and your Background color to #dad9d9. Type in “SEO BLACKBOOK”, and right click on the layer. Follow the settings below.

Now, set the drop shadow settings for our text. Just follow the settings.

Just copy the settings from “Get a FREE!” layer and add this text “Just fill out your name and email” and on another line “and a download link will be send.”

Now we will create the input text, this is where you put your name and email. First, set your Foreground color to #FFFFFF, and Background Color to # dad9d9. Grab your Rounded Rectangular Tool (U) and set the radius to 20px (it’s on the top).

Go to Blending options (Right click the layer) Gradients and set your Opacity to 34%.

Still in Blending Options, go to Stroke set the foreground to # 0662a2, and set the size to 10px.

After that, just copy the input layer and include a text inside of it. The font is Arial Bold and the size is 31pt and the Foreground color is # dad9d9.

Now we will create the button which will be the call to action of the entire form. Select your Rounded Rectangle Tool (U) and set the radius to 10px. Foreground Color is # fcb501, and Background Color to #ff5907.

Set the Gradient and just click Reverse.

Still in the Blending Option, go to Stroke and set the Foreground to # fcb501, and the size to 2px.

Now, copy the button layer and disable the effects on it and select the Paint Bucket Tool and Foreground to #cd4c0c. Press your arrow key down by 4 times so you’ll have something like this.

Type in “Get Instant Access” and color it with #2a2316.

We will create the glossy effect of the button, first create a new layer and click the button layer and fill it with #FFFFFF. Name it glossy.

Now, Select Rounded Rectangle Tool and create another one above the glossy layer. Right Click and select Make Selection, after that select glossy layer and just press delete. And delete the shape layer that we created earlier.

You’ll have something like this:

After that, deselect the layer and set the Opacity to 50%, here is the final product of our button.
Now, we are finally finished. Here is the end result, I just added a few texts and a pattern background some drop shadow.

We’ve achieve a detailed Opt-in form, the button stands out and makes you want to click it. All you have to do is convert this into HTML and CSS and connect it using your favorite mailing list.
You can download the PSD of the tutorial and if you have questions please do so in the comments. Hopefully you can use this in your own website and build your mailing list, If you came up with a different version of the tutorial please include them in the comments.
[sociallocker id=”3494″]Download[/sociallocker]